Showing posts with label distress watercolour pencil crayons. Show all posts

Monday, March 10, 2025

Choose to Shine

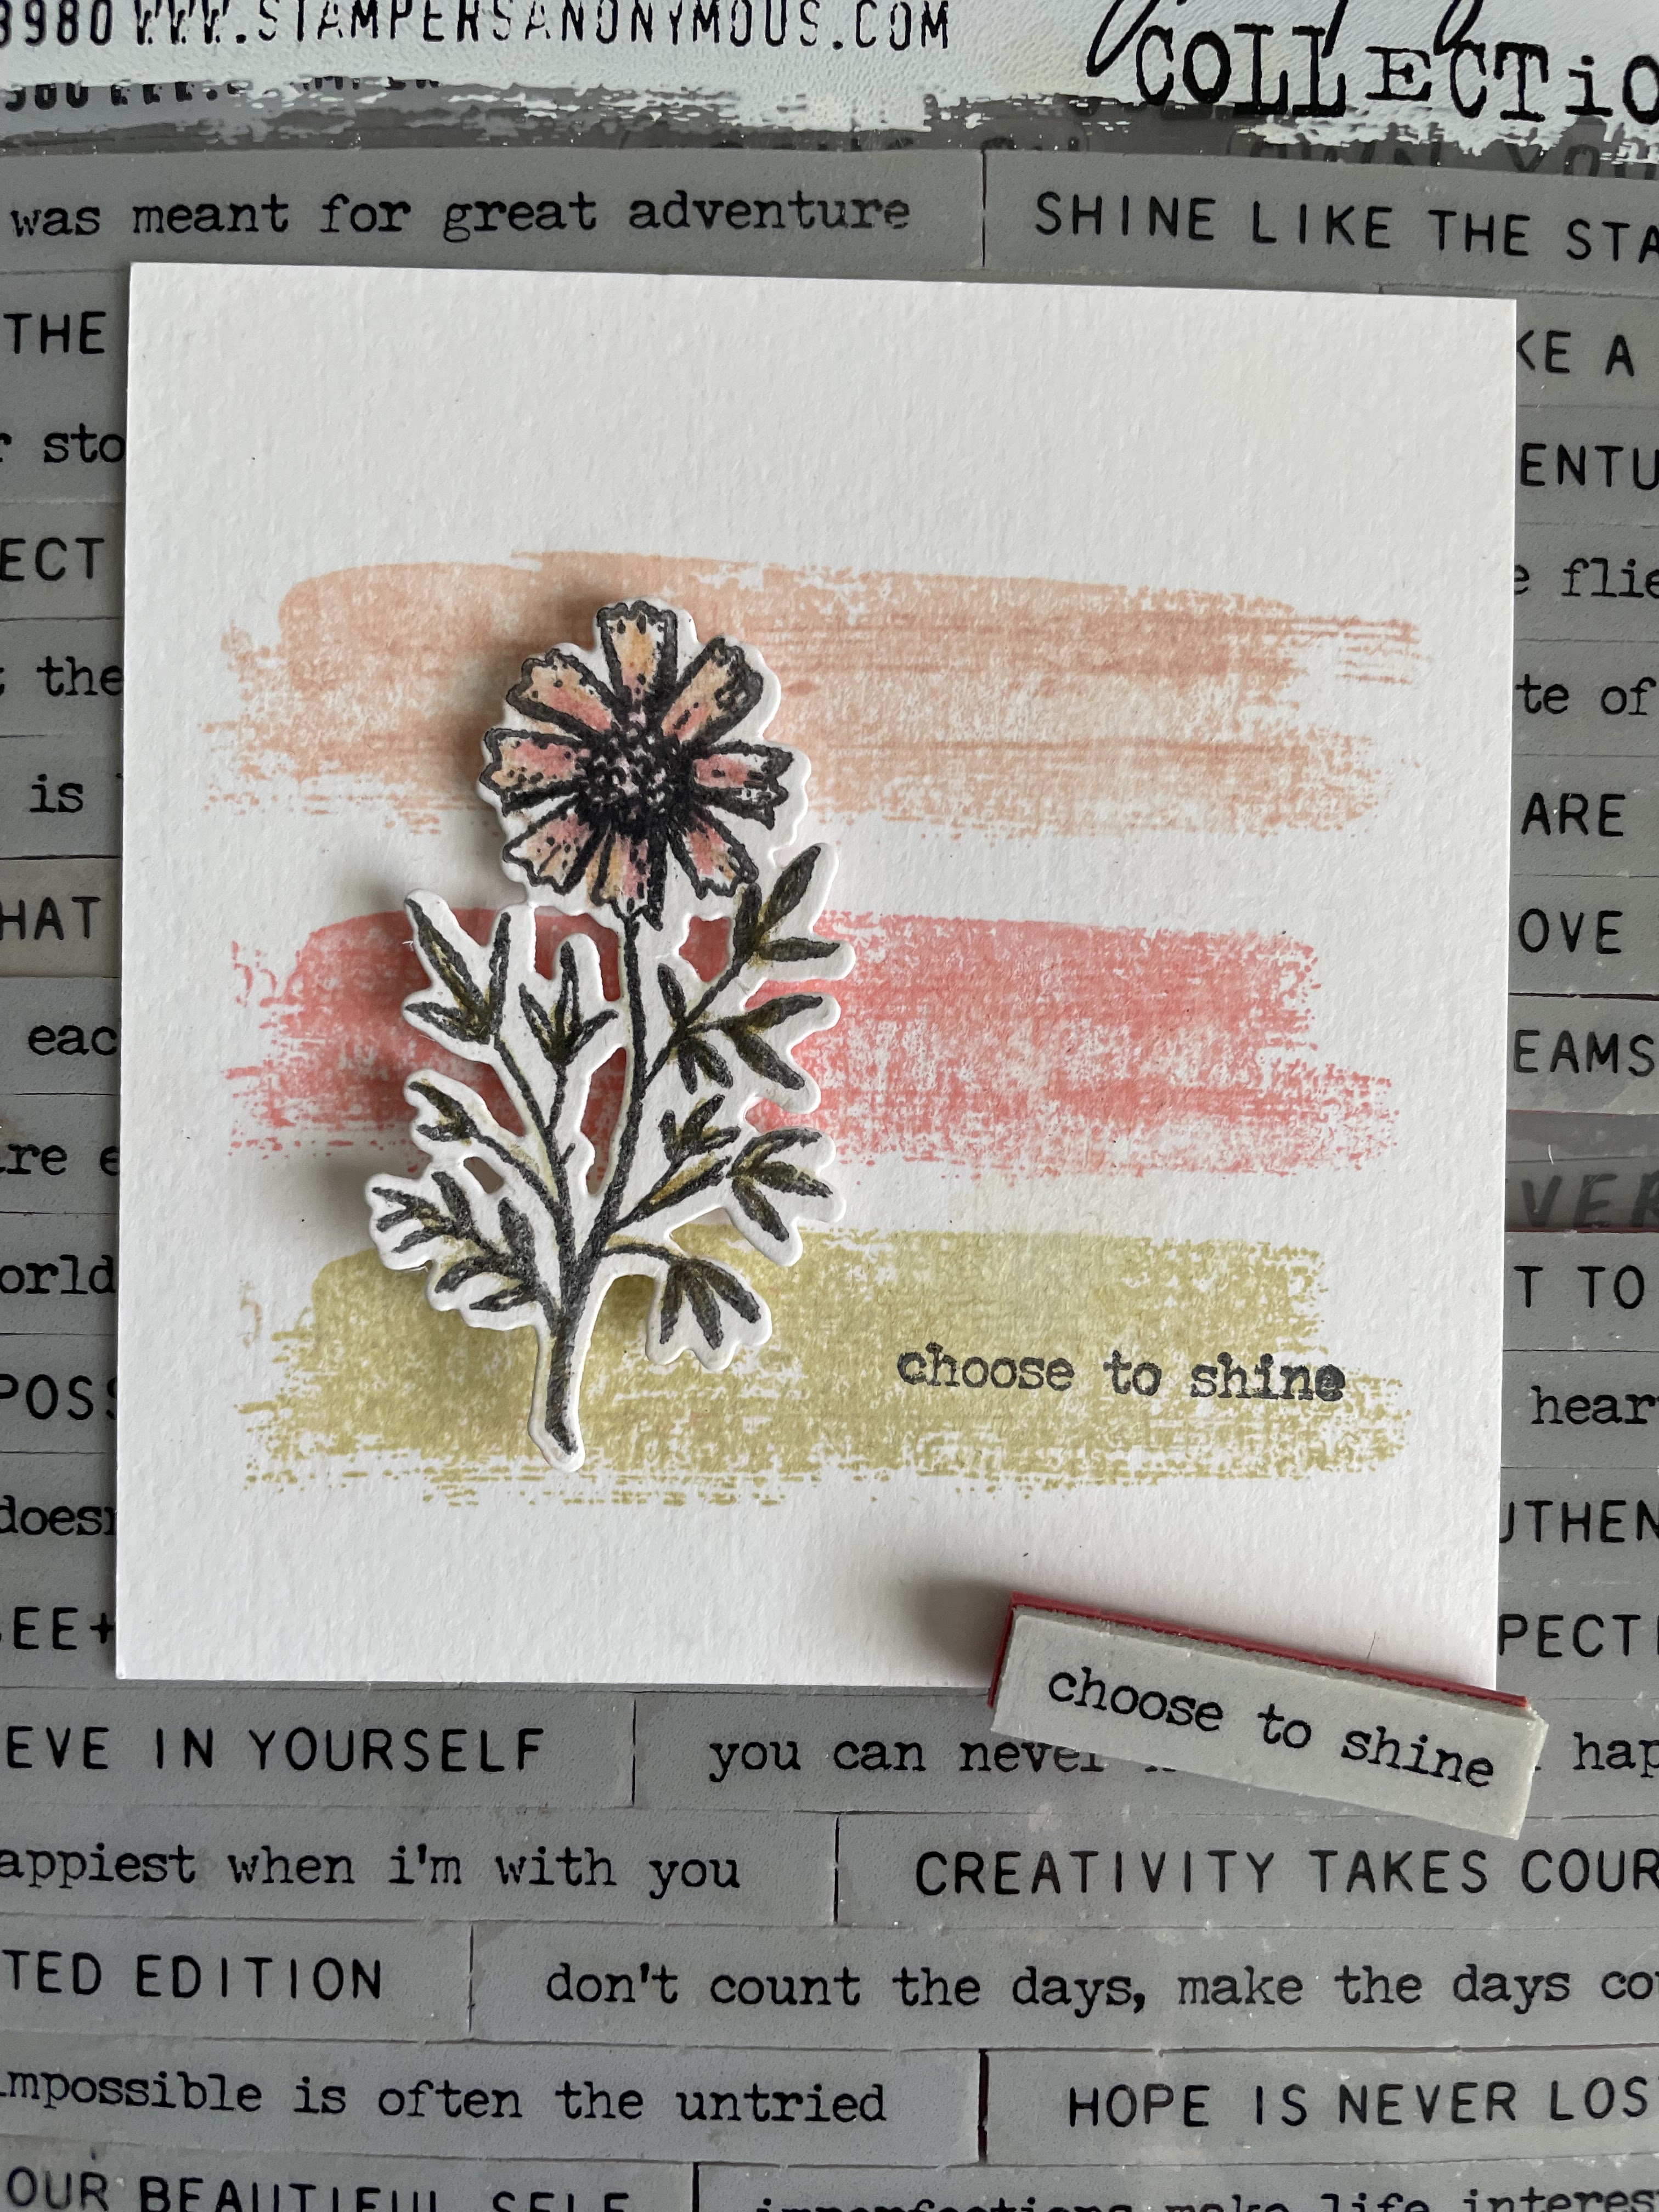
 Receiving Simon Says Stamp card of the month kit for February ~ distress vintage notes ~ I knew the possibilities would be endless. With coordinating dies makes it easier to cut, no fuss and easy. I adore the flower stamp and music notes, and thought they would be perfect on a card. This is what I came up with.


Starting with distress watercolour card stock, distress oxides in tattered rose, saltwater taffy and old paper creates a nice soft background with TH/SA cms293 brushstrokes stamp set.


Giving the brushstrokes more definition lightly stamp the musical notes with coordinating distress inks.


The flower stamp from sss vintage love notes is the perfect size for this card. Stamped with distress archival ink makes it easier to use with distress watercolour pencil crayons. The beauty of these pencil crayons is they blend like butter. No water needed. I wanted to keep the colour family by using tattered rose, saltwater taffy and old paper. Using the same colours in different distress gives the card dimension. sss vintage love notes comes with coordinating dies. Perfect for the flower 


TH/SA cms394 tiny text has a type set font that is the perfect size for this make. 


I picked up a tip from one of my crafty friends, Kath Stewart, by creating a soft blend just around the edges of white card stock with distress oxide in tattered rose. 

Creating the border, machine stitched with cream thread creating an elegant yet messy look by leaving loose ends at the corners.

Hope you enjoyed my tutorial and it leaves you feeling inspired.

Christina


Sunday, November 24, 2024

Berry Wishes

 Winter is here. We had our first snowfall warning for the season, up to 25cm for this weekend. There is a mountain ash tree out front (it has always been a late bloomer) and looks so beautiful especially with all the snow on top of the berries.


I was inspired to make a Winter + Christmas card with all the warm + cozy vintage feels.


The Base:

Distress watercolour card stock is my go to for card bases. Smoosh distress ink lost shadow, distress oxide in pumice stone, distress sprayer for movement, heat set between layers. Spray distress spritz in weather wood in random areas of card base, then heat set.


It's all in the layers:

Creating depth on the card base using texture fades birch trees and falling snow. Distress ink pumice stone for definition.


Adding more layers for depth. Branch birch die + 3D texture fades lumber. Using the poking tool from my sidekick to get all the negative shapes out of the branch birch die. 


Giving the trees a little more character by adding a blend of distress inks frayed burlap + lost shadow. Ending with an even blend on top of lost shadow. This gives a soft wintery effect.


I love the size of birds from the vault series lovebirds. They are perfect for this make. Die cut the bird twice, blend distress inks pumice stone, old paper, distress oxide antique linen to the body and feet of the bird. Distress inks lost shadow + scorched timber for the wings (cut out wing from second bird) and head. Use pop up dots to adhere wing on top of bird. Make sure to leave an opening white on the face of the bird. 


Giving the illusion of snow on the birds wing, using a splatter brush + distress paint picket fence.


Making twigs for the winter bird to perch on with wood planks from my stash + vault wildflowers.


Tim's + Stampers Anonymous new stamp set Florist Floor is definitely another favourite. I love the scale of these stamps. I chose the twig of berries. Stamped in archival ink + coloured with distress watercolour pencil crayons, on the branches and berries. 


Tim's new recoil scissors makes fussy cutting a lot easier. The comfort grip gives you more control when cutting the details of a stamp. Fussy cut the berries from florist floor, then apply texture paste sparkle. Let it air dry. The results are amazing. Gives the right amount of sparkle and give an elegant look of snow + frost on the berries.


The Finishing touches:

Adhere the winter bird with pop up dots, twigs + berries for the bird to perch on with collage medium. Tim's idea ology label stickers 'wishes' 


The final touch that ties everything together, a machine stitched border, leaving a few loose threads at the corners. 


I hope you enjoyed all the warm + cozy vintage feels of this make and it leaves you feeling inspired.

Christina 


Thursday, November 21, 2024

Dashing Through the Snow

 Tim Holtz + Stampers Anonymous Home for Christmas stamp set has all the vintage feels. Especially the vehicle with the Christmas tree on top. I made a Christmas card using this stamp with a twist.


The Base:

Distress watercolour card stock as the base. Distress inks in antique linen + pumice stone, distress oxide in antique linen, spritz with water dying between layers. Next add droplets of distress spritz in antique linen for a nice sparkling finish.


It's all in the Layers:

Alterations texture fade in falling snow has been my go to this year. It adds the right amount of texture to any make. Another go to for me is distress ink walnut stain. It's perfect for blending edges.


I had a 'what if ' moment. Making a wood panel for the side of the car. Using distress wood grain card stock + a blend of distress inks in antique linen, gathered twigs + vintage photo.


Stamp the vintage car twice, masking out the tree. Distress watercolour pencil crayon in aged mahogany for car base, then cut out door panel from wood grain background. Adhere panel to car.


I chose a different tree to place on top of the car from the stamp set Into the Woods, with distress inks in forest moss + vintage photo.


Finishing Touches:

Tim's re-coiling scissors are awesome for fussy cutting, especially being left handed make it easier. Fussy cut the tree, then adhere to top of car. I love the type written font stamps from Home for Christmas. I chose the saying ' dashing through the snow' masked out the word 'snow' then stamped the top portion to the card. The font from Tim's new vault seasonal sketch dies is awesome. Die cut the letters 'S' 'N' 'O' 'W' from Kraft stock classic in red and place them under the saying. 


To complete the card, I machine stitched the border using cream thread.


Hope you enjoyed all the vintage feels and it leaves you feeling inspired.

Christina


Wednesday, May 8, 2024

Be Awesome Today

 With Mother's day fast approaching, I made a detailed ATC (artist trading card) for my mom. I chose it for the size 2-1/2 x 3-1/2. It's perfect for layering elements especially if it's something new you want to try and less intimidating. 


The base:  Starting with mixed media heavy stock for the base, ink up cms348 ornate & lace stamp set, I used the ornate stamp, with distress ink/oxide in tattered rose. Ink edges of card stock starting with antique linen, pumice stone, then finishing with walnut stain.


It's all the layers:  Aging the doily from Tim's vault boutique die with distress inks in old paper and walnut stain with a ink blending tool.


Next I cut the paper down to the size of an ATC. Adhered the doily to one side of the ATC then trimming off the excess. Made a frame from the vault picture show dies set. Then I inserted an old photo of my mom using a mini printer.


When I saw Tim's and Stampers Anonymous new stamps from forgotten garden, I new they would be well used. I also purchased the co-ordinating dies from SSS which makes a huge difference if you're not a huge fan of fussy cutting. Next colour with distress watercolour pencils, they blend well and are easy to control.


The finishing touch:    Tim Holtz/idea ology small talk stickers are great for adding little sayings to your makes and add the perfect touch. I used pop ups for dimension.


I hope you enjoyed the process of my make and it leaves you feeling inspired.

Christina


Tuesday, April 9, 2024

Date Nite

 Have you seen Tim's second Vault Series? All the dies are incredible. So much detail in all of them. One of my favourites is the Vault Picture Show. I used the film strip to make a 'date nite' card. 


The Base: 

Starting with distress watercolour card stock, place THS095 layering stencil in peppermint on top, and blend with distress oxides, barn door and antique linen. This gives a nice soft look. Distress ink walnut stain is my go to for giving definition around edges of backgrounds. 


It's all in the layers: 

I love TH/Stampers Anonymous blueprint stamps. They are easy to colour and fun to play with. I used cms195 treats blueprint (popcorn) stamped with archival ink and coloured with distress watercolour pencils.


Have you ever gone through your stash and found something that you haven't used in years, forgot you had it? Luck made it's way to me when I found Tim's idea ology film strip ribbon. I knew this would make a great underlay because of it's transparency, then using my tiny attacher to secure it in place. Next I layered the film strip from Vault Picture show in kraft stock, red, overlapping slightly to create dimension. 


The making of the 'popcorn' inspired by Zoe Hillman.
Die cut two small tattered florals with distress watercolour card stock. Colour/scribble with distress watercolour pencil crayons and blend with a water brush. Shape florals with fingers to create 'popcorn' adhere with collage medium. It's easy peasy.


I just love the font from the Vault World Travel die set. The letters really pop out when you add a drop shadow. Choosing to add a number for fun. 'DA8' It's date nite.


The finishing touch: 

My other go to for a deeper, softer blend around the edges is Scorched Timber. It blends like butter and gives the slightest hint of definition.


I hope you enjoyed the process of my make and it leaves you feeling inspired.

Christina 


Monday, March 18, 2024

Hip Hop ... Pity

 I was inspired by Tim's demo from his Easter + Spring Ideas 2024 live to make a fun Easter card.


I started with distress mixed media heavy stock as the base. Smooshed distress inks on my craft sheet, spritz with water, dabbed card base in inks and heat setting between layers.


Next I placed the stencil from TH/SA mixed media stamps and stencil set, THMM183, (circles) onto inked background and coloured with distress watercolour pencils, then lifting the stencil to out line them. This is a really cool technique. You can find this in Tim's demo. It's at the 1:36:31 mark. 


The TH/Sizzix bigz die butterfly duo with texture fades is perfect for this card, just the right size and the details are awesome. Distress oxides for the base and distress ink in scorched timber swiped over the raised embossed area. I love the look that scorched timber gives, it's almost a black brown depending on how you apply it. 


Switching the butterfly up by adding bunny ears from TH/Sizzix thinlits bunny hop vault die for the antennas, coloured with distress inks, to give dimension to the ears.


The fonts of the stamp set Crazy Talk are so fun. I used the quirky hand written saying 'hippity hoppity' inked in distress embossing ink and embossed with Ranger embossing powder - white, on blackout kraft stock. Then cut the words in sections to create my own words.


Pop ups for the butterfly, rabbit ears and sookwang adhesive for the words.


I hope you enjoyed my tutorial and it leaves you feeling inspired.

Christina 


Tuesday, November 21, 2023

Wishes

 Creating a non traditional Christmas card or can be made for any occasion. Using the ever popular stamp from Tim and Stampers Anonymous, the inspector. I knew the moment I got this stamp set, what great inspiration would come from it. 

I made a mini slimline card.


The base

Mixed media heavy stock as the base. "Smooshed" into distress ink pumice stone. Heat setting between layers. 


It's all in the layers

Create a mask by stamping the dial from cms465 the inspector in distress archival black soot onto copy paper and fussy cut. First stamp the dial on the background, then temporarily adhere mask over top, then stamp those funky letters on the top and bottom of background in distress archival ground espresso.


The Inspectors hat is stamped in distress archival dusty concord and ground espresso. His glasses stamped in dusty concord and coloured with distress watercolour pencil crayon in villanous potion. Used an eraser for hi lights. Next fussy cut the hat and glasses and adhere with pop ups to card.


Finishing touches 

For the word "wishes" I used one of Tim's older Sizzix dies holiday words: blocks (retired), using the positive letters on purple kraft stock.


Next I machine stitched on either side of the word "wishes" with cream thread, leaving loose threads at the corners.


Blend distress ink in walnut stain around the edges of card. (this is my go to for blending the edges of my makes) Then I added distress archival in ground espresso, by swiping it around the edges of the tag for added dimension.


This was a really fun card to make. 


I hope you enjoyed the process as much as I did making it. The possibilities are endless.

Christina 


We Are Fearless

 Creativity is good for the soul. A healthy escape and cheaper than therapy. I made this mixed media card using many of Tim’s techniques fro...